LM7 4-Pin to 1-Wire Alternator Wiring Guide
LM7 4 Pin To 1 Cable Alternator Wiring Diagram: Below is a detailed, structured article using five H₂ sections, explaining how to convert an LM7 alternator from its factory 4-pin configuration into a clean, efficient 1-wire system. This covers why you might want the change, how the wiring works, and all the prep, execution, and precautions involved.
1. What Are the Four Pins on the LM7 Alternator?
Understanding the purpose of each plug terminal is essential:
- S (Sense): Monitors system voltage, helping the regulator adjust charging based on battery tension. In simplified setups, it can often be bypassed.
- F (Field Duty Signal): Used by the ECU in factory setups to monitor alternator load and diagnose charging errors. Not needed in aftermarket conversions.
- L (Exciter / Lamp): Provides initial excitation to energize the alternator. It’s the most critical wire in a single-wire conversion.
- P (Pulse / Tach): Outputs a signal for tachometers or systems needing engine-on detection. Commonly unused in basic alternator setups.
2. Why Convert to a 1-Wire Setup?
- Simplification: Ideal for engine swaps or custom installs where you don’t need the full factory harness.
- Cleaner wiring: Reduces clutter and ease of diagnosis.
- Self-exciting operation: The alternator activates and charges as soon as the engine runs—no ECM required.
- Versatility: Works well in performance builds, classics, and simple electrical systems
3. How to Convert – Step-by-Step Method
Step-by-Step Process
- Prepare Tools & Safety First: Disconnect the battery before touching wiring. Use insulated tools and wear safety equipment.
- Identify the Alternator Pins: Locate S, F, L, and P on the alternator plug.
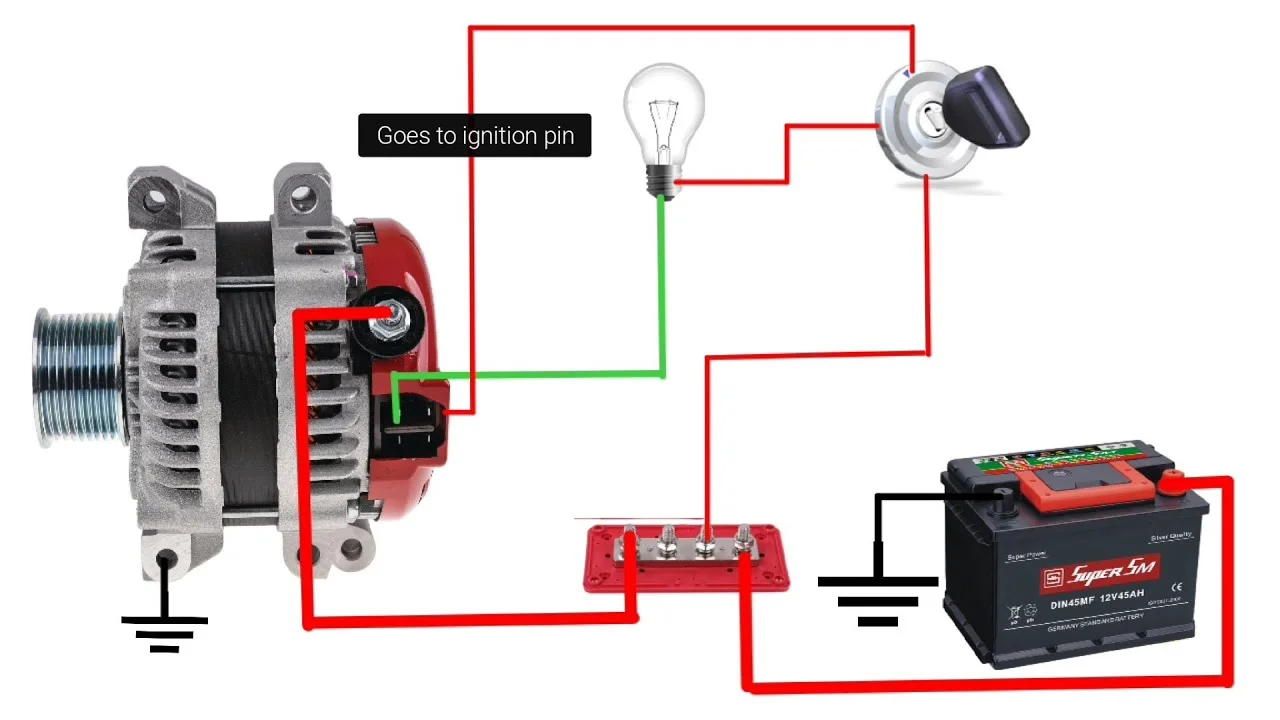
- B+ Output Cable (Main Charging Line):
- Connect a heavy-gauge wire (typically 2–4 AWG) from the alternator’s B+ stud directly to the battery positive, ideally fused at ~15% over alternator rating.
- Exciter (“L”) Wire with Resistor:
- Run a switched ignition 12 V line into the L terminal via a 470 Ω resistor (approx. 1 W) to protect the regulator. This replicates the resistance originally provided by a dash “dummy light.” Avoid tying L directly to battery or full ignition voltage.
- Unused Terminals (S, F, P):
- S: Either cap it off or connect it to the B+ post for built-in voltage sensing (enhances stability).
- F and P: Leave disconnected and insulated unless your setup specifically needs them.
- Ensure Effective Grounding:
- Make sure the alternator housing shares a good ground with the engine block. If necessary, add a dedicated ground wire to ensure reliability.
4. When to Use This Setup — Pros & Caution
Ideal Situations:
- Engine swaps without ECM
- Motorsport or classic restoration projects
- Simple electrical systems without dash diagnostics
Situations to Avoid:
- Systems requiring ECU monitoring via F or P wires
- Vehicles that depend on precise voltage data via the S terminal
- Situations needing “charge” dashboard lights unless you rewire a lamp or add a resistor setup
5. Safety Tips & Troubleshooting
- Never apply full battery voltage to the L pin—it will overload and destroy the regulator. Always use the resistor.
- Fuse the B+ line close to the battery. A short in this line poses a huge fire risk otherwise.
- Check grounds: A poor ground is one of the most common causes of alternator failure.
- Watch for voltage drops: Use thick wire and short runs. Alternators are sensitive to low voltage feedback.
- Optional resistor workaround: If the dash’s indicator light is no longer used, its resistance can be mimicked with a standalone resistor to complete the excitation circuit.
Summary Table
| Terminal | Function | In 1-Wire Setup |
|---|---|---|
| B+ | Output | Heavy fused cable to battery |
| L | Exciter | Switched +12 V → 470 Ω resistor → L |
| S | Sense | Optional loop to B+ / cap off |
| F | Field Signal | Not used; cap |
| P | Pulse/Tach | Not used; cap |
Final Thoughts
Converting your LM7 alternator from a 4-pin to a streamlined 1-wire setup is a smart move for simplified builds and tactile reliability. Just be sure to respect the resistor requirement on the L pin, use good gauge wiring, and maintain solid grounds.
Need help matching wire gauges for your specific amps, or choosing the right resistor for your dash-free setup? Let me know—happy to assist!